Security of Information, Threat Intelligence, Hacking, Offensive Security, Pentest, Open Source, Hackers Tools, Leaks, Pr1v8, Premium Courses Free, etc

  • Penetration Testing Distribution - BackBox

    BackBox is a penetration test and security assessment oriented Ubuntu-based Linux distribution providing a network and informatic systems analysis toolkit. It includes a complete set of tools required for ethical hacking and security testing...
  • Pentest Distro Linux - Weakerth4n

    Weakerth4n is a penetration testing distribution which is built from Debian Squeeze.For the desktop environment it uses Fluxbox...
  • The Amnesic Incognito Live System - Tails

    Tails is a live system that aims to preserve your privacy and anonymity. It helps you to use the Internet anonymously and circumvent censorship...
  • Penetration Testing Distribution - BlackArch

    BlackArch is a penetration testing distribution based on Arch Linux that provides a large amount of cyber security tools. It is an open-source distro created specially for penetration testers and security researchers...
  • The Best Penetration Testing Distribution - Kali Linux

    Kali Linux is a Debian-based distribution for digital forensics and penetration testing, developed and maintained by Offensive Security. Mati Aharoni and Devon Kearns rewrote BackTrack...
  • Friendly OS designed for Pentesting - ParrotOS

    Parrot Security OS is a cloud friendly operating system designed for Pentesting, Computer Forensic, Reverse engineering, Hacking, Cloud pentesting...
Showing posts with label IDS/IPS. Show all posts

Sunday, July 8, 2018

Security Onion - Linux Distro For IDS, NSM, And Log Management


Security Onion is a free and open source Linux distribution for intrusion detection, enterprise security monitoring, and log management. It includes Elasticsearch, Logstash, Kibana, Snort, Suricata, Bro, OSSEC, Sguil, Squert, NetworkMiner, and many other security tools. The easy-to-use Setup wizard allows you to build an army of distributed sensors for your enterprise in minutes!

Security-onion project
This repo contains the ISO image, Wiki, and Roadmap for Security Onion.

Looking for documentation?
Please proceed to the Wiki.

Screenshots


Share:

Sunday, August 28, 2016

Firewall and IDS Evasion / Bypassing the Firewalls and IDS/IPS - NMAP Scanning Tutorial


This post is for penetration testers that face issues with scanning the Corporate networks with firewalls deployed and are unable to bypass the Firewall or an IDS/IPS .
Firewall is generally a software or hardware to protect private network from public network.This is a trouble maker for the Penetration testers as they are not able to bypass this added layer of security .
Well the good news here is that we can use Nmap options to bypass the firewalls , IDS/IPS .
If a penetration tester can bypass firewall then half game is won for the penetration tester. In this tutorial you will learn how to bypass and test firewall using the NMAP options.


NMAP options to Bypass the Firewall :


-f (fragment packets):

This option is to make it harder to detect the packets. By specifying this option once, Nmap will split the packet into 8 bytes or less after the IP header. This makes the detection of Nmap sent packets difficult .

–mtu:

With this option, you can specify your own packet size fragmentation. The Maximum Transmission Unit (MTU) must be a multiple of eight or Nmap will give an error and exit. This helps in Firewall Evasion .

-D (decoy):

By using this option, Nmap will send some of the probes from the spoofed IP addresses specified by the user. The idea is to mask the true IP address of the user in the logfiles. The user IP address is still in the logs. You can use RND to generate a random IP address or RND:number to generate the <number> IP address. The hosts you use for decoys should be up, or you will flood the target. Also remember that by using many decoys you can cause network congestion, so you may want to avoid that especially if you are scanning your client network.

–source-port <portnumber> or –g (spoof source port):

This option will be useful if the firewall is set up to allow all incoming traffic that comes from a specific port.

–data-length:

This option is used to change the default data length sent by Nmap in order to avoid being detected as Nmap scans.

–max-parallelism:

This option is usually set to one in order to instruct Nmap to send no more than one probe at a time to the target host.

–scan-delay <time>:

This option can be used to evade IDS/IPS that uses a threshold to detect port scanning activity. Setting the Scan delay is always a good idea when you want to evade any security device .

Sources : Nmap.org

OffSec 

http://nmap.org/book/man-bypass-firewalls-ids.html
Share:

Wednesday, July 13, 2016

Intrusion Detection/Prevention System (IDS/IPS) Testing Framework - pytbull


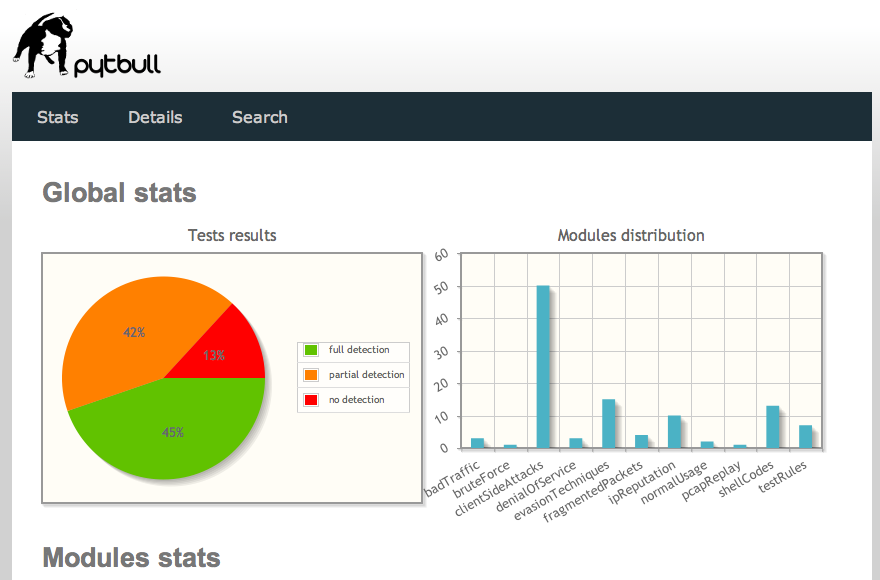
pytbull is an Intrusion Detection/Prevention System (IDS/IPS) Testing Framework for Snort, Suricata and any IDS/IPS that generates an alert file. It can be used to test the detection and blocking capabilities of an IDS/IPS, to compare IDS/IPS, to compare configuration modifications and to check/validate configurations.

The framework is shipped with about 300 tests grouped in 11 testing modules:
  1. badTraffic: Non RFC compliant packets are sent to the server to test how packets are processed.
  2. bruteForce: tests the ability of the server to track brute force attacks (e.g. FTP). Makes use of custom rules on Snort and Suricata.
  3. clientSideAttacks: this module uses a reverse shell to provide the server with instructions to download remote malicious files. This module tests the ability of the IDS/IPS to protect against client-side attacks.
  4. denialOfService: tests the ability of the IDS/IPS to protect against DoS attempts
  5. evasionTechniques: various evasion techniques are used to check if the IDS/IPS can detect them.
  6. fragmentedPackets: various fragmented payloads are sent to server to test its ability to recompose them and detect the attacks.
  7. ipReputation: tests the ability of the server to detect traffic from/to low reputation servers.
  8. normalUsage: Payloads that correspond to a normal usage.
  9. pcapReplay: enables to replay pcap files
  10. shellCodes: send various shellcodes to the server on port 21/tcp to test the ability of the server to detect/reject shellcodes.
  11. testRules: basic rules testing. These attacks are supposed to be detected by the rules sets shipped with the IDS/IPS.
It is easily configurable and could integrate new modules in the future.
There are basically 5 types of tests:
  1. socket: open a socket on a given port and send the payloads to the remote target on that port.
  2. command: send command to the remote target with the subprocess.call() python function.
  3. scapy: send special crafted payloads based on the Scapy syntax
  4. client side attacks: use a reverse shell on the remote target and send commands to it to make them processed by the server (typically wget commands).
  5. pcap replay: enables to replay traffic based on pcap files

Architecture

Remote mode

In this mode, the IDS is plugged on the span port (or port mirroring) of the core switch and is configured in promiscuous mode. The IDS analyzes all traffic that goes through the core switch. Malicious files can be downloaded either by pytbull or by the server. This mode is called "remote".


Local mode

In this mode, files are downloaded on the client pytbull is started from.

IDS mode with attacked server in DMZ

In this configuration, a firewall splits the network into 3 parts (lan, wan, dmz). The IDS is plugged in a span port (or port mirroring) of the switch with its interface configured in promiscuous mode. It will analyze every traffic that is sent to the LAN interface of the firewall.


IPS mode

In this configuration, a firewall splits the network into 3 parts (lan, wan, dmz). The IDS is plugged between pytbull and the firewall. To give the IDS a chance to detect the malicious files, pytbull has to download the infected files itself.


IPS mode with attacked server in DMZ

In this configuration, a firewall splits the network into 3 parts (lan, wan, dmz). The IDS is plugged between pytbull and the firewall. Malicious files have to be downloaded by pytbull directly to give the IDS a chance to detect them.


Usage

If you have selected the clientSideAttacks module (see configuration file section for more information), you will need to start the reverse shell on the server. Following command uses port 34567/tcp:
$ ./pytbull-server.py -p 34567
Since the files are downloaded in the current directory, you can create a pdf/ directory and start pytbull from the parent location:
$ mkdir pdf/
$ cd pdf/
$ ../pytbull-server.py -p 34567
Then start pytbull (on the client side). An example to start pytbull tests against 192.168.100.48, running Snort:
$ sudo ./pytbull -t 192.168.100.48

Notice that you will need to adapt (config.cfg) the port used by the reverse shell if you use the optional parameter -p on remote side.


Share:
Copyright © Offensive Sec Blog | Powered by OffensiveSec
Design by OffSec | Theme by Nasa Records | Distributed By Pirate Edition